Why Suede Loafers Need Special Treatment: The 10-Minute Maintenance Routine
Suede loafers are stylish but tricky. Discover why they need special care and how a quick 10-minute routine can keep them looking new.
This post may contain affiliate links. If you make a purchase through these links, we may earn a commission at no additional cost to you.
Suede loafers are a classic choice. They look sharp, feel comfortable, and add a touch of effortless style to many outfits. But anyone who owns a pair knows they aren’t like your average leather shoes. Suede has a unique texture and feel, which is exactly what makes it special. However, that same unique quality means it needs a different kind of care. You can’t just polish them up like calfskin. Suede requires a gentler, more specific approach to stay looking its best. Ignoring this can quickly turn your stylish loafers into a scruffy mess.
This guide will explain exactly why suede needs special attention. We’ll dive into what makes this material different and why it’s so prone to showing dirt and stains. More importantly, we’ll give you a simple, effective 10-minute maintenance routine you can easily fit into your schedule. This routine isn’t just about cleaning; it’s about protecting your investment and keeping your loafers looking sharp for years to come. We’ll cover the essential tools you need, how to use them correctly, and how to tackle common issues. By the end, you’ll understand the ‘why’ behind suede care and have a clear, actionable plan for the ‘how’.
The Unique Nature of Suede: Why It’s Different
Understanding why suede needs special treatment starts with understanding what suede actually is. Unlike standard leather, which uses the tough outer layer of the animal hide (the grain side), suede is made from the underside of the hide. This inner layer is buffed and sanded to create that soft, fuzzy surface we recognize as suede. This surface is called the nap. Think of the nap as millions of tiny, raised fibers.
This fibrous structure is the key to suede’s look and feel. It’s also why it’s so vulnerable. The nap provides countless tiny surfaces for dirt particles, dust, and liquids to cling to. When you scuff suede, you’re essentially matting down or damaging these delicate fibers. When water hits suede, it doesn’t just sit on the surface; it gets absorbed into the spaces between the fibers and can cause them to clump together, leaving behind noticeable water stains. This porous nature, while contributing to its softness, makes it a magnet for the elements and everyday grime.
Compared to smooth leather, which has a relatively sealed surface that can be wiped clean, suede’s open, fibrous structure means dirt gets into the material, not just on top of it. This is why a quick wipe with a damp cloth, which works for leather, can actually make suede look worse by pushing dirt deeper into the nap or causing water stains. Its beauty is in its texture, but that texture demands a specific kind of cleaning and protection to maintain its appearance.
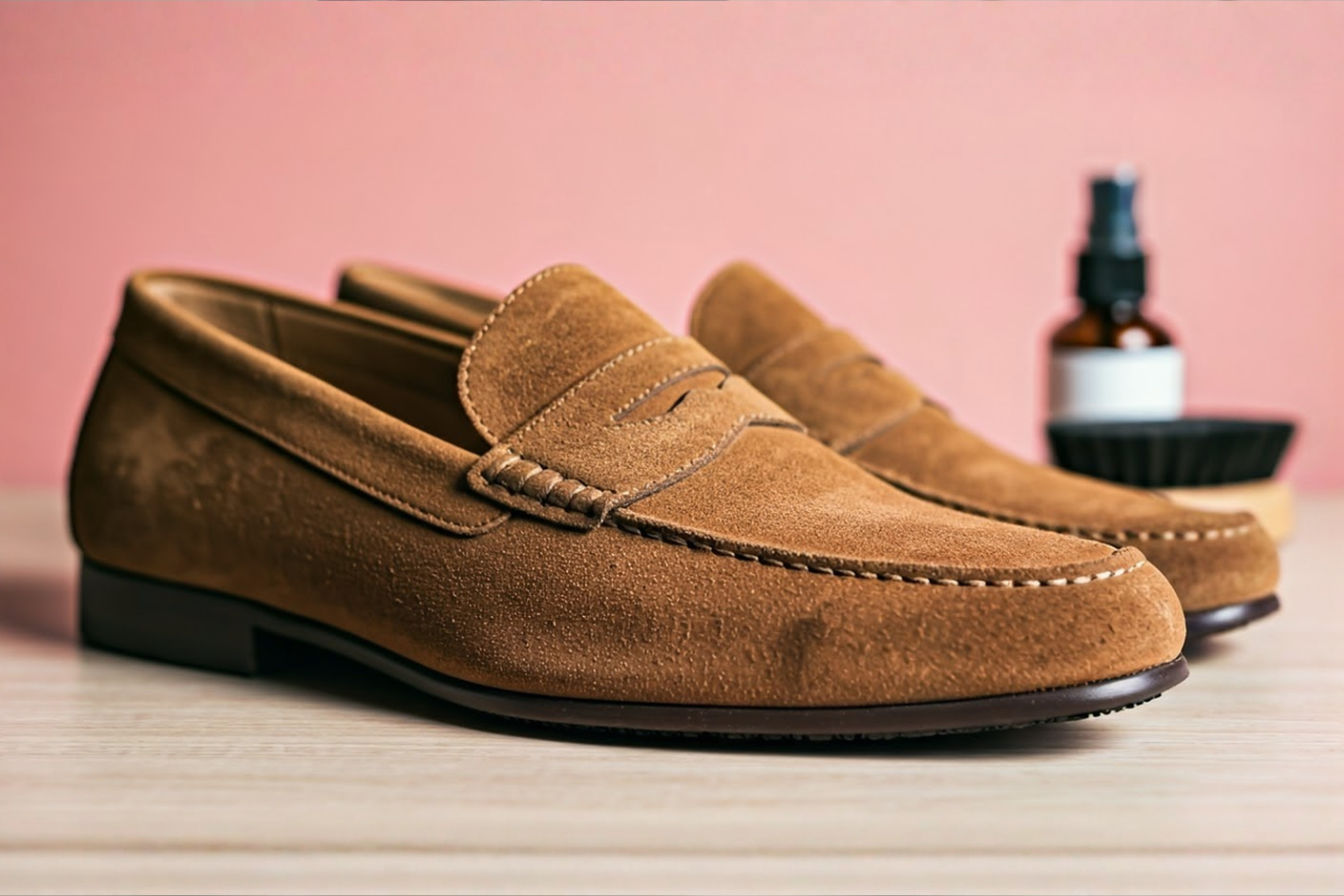
The Essential Toolkit for Suede Care
Before you start any maintenance, you need the right tools. Think of this as setting up your small, dedicated suede care station. Having these items readily available makes the 10-minute routine quick and easy. You don’t need a huge collection of products, just a few key items designed specifically for suede. Using the wrong tools, like a stiff brush meant for rough surfaces, can actually damage the delicate nap of your loafers.
Here are the essentials you’ll need:
The Suede Brush
This is arguably the most important tool in your kit. A good suede brush typically has two sides: one with brass bristles and one with rubber or nylon bristles. Some brushes also have a ribbed rubber edge or a small brush head for getting into tight spots.
- What it does: The bristles are designed to gently lift and realign the suede nap. Dust, light dirt, and superficial marks often just sit on top of the nap or cause it to lie flat. Brushing helps to remove these particles and restore the texture.
- Why it’s special: The key is the softness of the bristles. Brass bristles for suede are much softer than those on a brush for cleaning metal or tough surfaces. They provide just enough stiffness to lift the nap without scratching or tearing the delicate fibers. The rubber or nylon side is even gentler and is great for more delicate suede or for a final pass.
- Technical Detail: The brass bristles work by creating a mild abrasive action against the suede fibers. This physical interaction dislodges trapped dirt particles and helps to separate fibers that have become matted down. The rubber or nylon bristles rely more on friction and static cling to lift dust and realign the nap without aggressive abrasion.
The Suede Eraser (or Suede Bar)
This looks a bit like a standard pencil eraser, but it’s made from a different material, typically a type of crepe rubber or a specialized synthetic compound.
- What it does: A suede eraser is designed for tackling stubborn marks, scuffs, and minor stains that brushing alone can’t remove. You use it by gently rubbing the affected area.
- Why it’s special: The material of the eraser works by essentially ‘grabbing’ the dirt or scuff mark as you rub. It creates friction that lifts the mark away from the suede fibers without introducing moisture, which can be detrimental to suede. As you rub, tiny particles of the eraser material may come off, carrying the dirt with them.
- Technical Detail: The crepe rubber or synthetic material has a slightly sticky or tacky surface at a microscopic level. When rubbed against the suede, this surface adheres to dirt particles embedded within the nap. The act of rubbing also generates mild heat and friction, which can help loosen the bond between the dirt and the suede fibers. The eraser material then lifts and encapsulates the dirt as it crumbles away.
Suede Protector Spray
This is your first line of defense against future damage. A good quality suede protector forms an invisible barrier on the surface of the shoe.
- What it does: It repels water, oil, and stains, preventing them from soaking into the suede fibers. This makes it much harder for dirt and liquids to bond with the material, meaning they often just bead up on the surface and can be wiped away.
- Why it’s special: These sprays use specific chemical compounds, often fluoropolymers or silicon-based polymers, that create a hydrophobic (water-repelling) and oleophobic (oil-repelling) layer. This layer coats the individual suede fibers without significantly altering the look or feel of the nap.
- Technical Detail: Fluoropolymer-based protectors, for instance, work by lowering the surface tension of the suede fibers. Liquids with higher surface tension (like water or oil) will struggle to spread out and penetrate the treated surface; instead, they tend to form droplets due to cohesive forces within the liquid being stronger than the adhesive forces between the liquid and the treated suede. Silicon-based protectors create a similar barrier effect by forming a microscopic, water-resistant film around the fibers. It’s crucial to apply these sprays evenly and allow them to dry completely for the protective barrier to form correctly. Always test on an inconspicuous area first.
A Clean Cloth
You’ll need a soft, clean cloth, preferably microfiber.
- What it does: Useful for wiping away loose dust or dirt before brushing, and for buffing gently after using the eraser.
- Why it’s special: Microfiber is ideal because its fine fibers are very effective at picking up dust and dirt without being abrasive. Avoid colored cloths that might bleed dye onto your suede.
Having these tools ready means you’re prepared to tackle the 10-minute routine efficiently. They are specifically designed to be gentle yet effective on the delicate nap of your suede loafers.
The 10-Minute Suede Maintenance Routine
This routine is designed to be quick, easy, and effective for regular upkeep. Doing this regularly – ideally after every few wears or at least once a week if you wear them often – will make a huge difference in keeping your suede loafers looking fresh. It’s about prevention and dealing with minor issues before they become major problems. You don’t need to dedicate a lot of time; just 10 minutes is enough for this preventative care.
Here’s the step-by-step breakdown:
Step 1: Prepare Your Loafers (1 minute)
Find a clean, well-lit space to work. Remove the shoe trees if you use them (though putting them back in after the routine is a good idea). Take a moment to visually inspect your loafers. Look for any obvious dirt, dust, or marks. This quick inspection helps you focus your efforts during the next steps. If there’s any loose debris, gently wipe it away with your clean cloth. Don’t rub aggressively, just a light pass to get off anything sitting on the surface.
Step 2: The All-Over Brush (3 minutes)
This is where your suede brush comes in. Start with the brass bristle side for general cleaning and nap lifting. Brush the entire surface of each loafer using light, consistent strokes. Always brush in the same direction to maintain a uniform look of the nap. Don’t scrub back and forth vigorously; think of it more as sweeping the surface and gently lifting the fibers.
- What you’re doing: You’re removing surface dust, light dirt, and any particles that have settled on the suede. You’re also working to restore the natural direction and texture of the nap, which can get flattened during wear. Pay attention to areas that crease or bend, as dirt can accumulate there.
- Why brush direction matters: Brushing in one direction helps to create that smooth, consistent look of the suede nap. Brushing back and forth can make the nap look messy and uneven, sometimes creating lighter or darker patches depending on how the fibers are lying.
- Technical Detail: The physical action of the bristles against the suede fibers dislodges dust and dirt through mechanical force. Brushing in a consistent direction helps to align the millions of tiny fibers that make up the nap. When these fibers are aligned, they reflect light more uniformly, giving the suede a smoother, richer appearance. When they are matted or going in different directions, light is scattered unevenly, making the suede look dull or patchy.
Step 3: Tackle Any Marks or Scuffs (3 minutes)
Now, address any specific marks or scuffs you noticed during your initial inspection, or that weren’t removed by general brushing. This is the job for your suede eraser.
- How to use it: Gently rub the eraser back and forth over the mark. Use light pressure at first and gradually increase it if needed. The friction will lift the mark. As you rub, some of the eraser material will crumble off – this is normal.
- What you’re doing: You’re using the eraser’s unique texture to ‘grab’ and lift embedded dirt or scuff marks from the suede fibers. Work specifically on the affected area.
- Technical Detail: As mentioned before, the eraser material adheres to the dirt particles. The friction generated by rubbing helps break the bond between the dirt and the suede. The crumbling action of the eraser helps to carry the lifted dirt away from the surface. It’s important to use a dedicated suede eraser, as a regular pencil eraser contains oils and other binders that can stain suede.
- After erasing: Once the mark is gone (or significantly reduced), use your suede brush again, brushing in the direction of the nap, to remove any eraser debris and realign the fibers in the treated area. You can use the rubber side of the brush here for a gentler touch.
Step 4: Re-Brush and Admire (1 minute)
After dealing with any specific marks, give the entire loafer another quick brush with the brass or rubber side, ensuring the nap is lying uniformly in one direction. This final brush helps to blend any areas you focused on with the eraser and gives the suede a clean, consistent look. Take a step back and look at your loafers. They should already look significantly better!
Step 5: Apply Protector Spray (If Needed) (2 minutes)
If your loafers haven’t been treated with a protector recently, or if you plan on wearing them in potentially damp conditions, now is the time to apply a suede protector spray. Always do this in a well-ventilated area, preferably outdoors.
- How to apply: Hold the can the distance recommended by the manufacturer (usually about 6-8 inches) and apply an even, light mist over the entire surface of the loafer. Don’t soak the suede; a light, uniform coating is all you need.
- What you’re doing: You’re replenishing or applying the protective barrier that repels water and stains.
- Technical Detail: The solvents in the spray allow the protective polymers to be evenly distributed across the suede surface. As the solvents evaporate, the polymers are left behind, forming a microscopic, water-repellent layer around the suede fibers. This layer disrupts the surface tension forces that would normally allow water and oil to spread and soak into the material.
- Drying Time: This step requires drying time, which is outside the 10-minute routine itself. Allow the loafers to dry completely before wearing them again. This can take several hours, depending on the product and humidity. Check the product instructions for specific drying times. Applying protector regularly (every few months or after deep cleaning) is a crucial part of long-term suede care.
That’s the 10-minute routine! It’s simple, requires minimal tools, and makes a big difference when done consistently.
Dealing with Specific Suede Issues
While the 10-minute routine is great for maintenance, sometimes your suede loafers encounter tougher challenges. Knowing how to handle common issues like water stains, mud, or oil can save your favorite pair. The key is to act quickly and use the right technique.
Water Stains
Water is suede’s natural enemy. It darkens the material and can leave behind tide marks as it dries, causing the nap to stiffen and clump.
- Why they happen: When water soaks into suede, it disrupts the alignment of the nap fibers and can pull dirt and dyes within the material to the edges of the wet area as it evaporates, creating a visible line or ‘stain’.
- How to treat:
- Act Fast: If they get wet, gently blot away as much excess water as possible with a clean, absorbent cloth immediately. Don’t rub!
- Dampen Evenly: This might sound counter-intuitive, but for dried water stains, you often need to re-wet the area, but evenly. Use a clean spray bottle with clean water and lightly mist the entire affected panel of the loafer (not just the stain). The goal is to dampen the area uniformly to avoid creating new marks.
- Blot Again: Gently blot the dampened area with a clean cloth to remove excess moisture.
- Stuff and Dry: Stuff the loafers with shoe trees or plain paper (newspaper ink can transfer) to help them hold their shape and absorb moisture. Let them air dry completely away from direct heat or sunlight, which can damage the suede.
- Brush: Once completely dry, use your suede brush to restore the nap. You may need to brush quite firmly to lift the stiffened fibers.
- Technical Detail: Re-wetting the area allows the water-soluble components (dirt, dyes) that formed the stain to redistribute more evenly throughout the suede fibers as the new water is absorbed. By dampening the entire panel, you minimize the chance of a new tide mark forming at the edge of the re-wet area. The subsequent drying process, aided by stuffing, helps the fibers dry in a more natural, less clumped state, making it easier to restore the nap with brushing.
Mud and Dirt
Dried mud or dirt can be challenging because it contains particles that get deeply embedded in the nap.
- How to treat:
- Let it Dry Completely: The most important step is patience. Do not try to clean wet mud. You’ll just push it deeper into the suede. Let the mud dry completely and harden.
- Break it Off: Once dry, gently break off as much of the caked-on mud as you can using your fingers or the back of a dull knife (be very careful not to cut the suede).
- Brush: Use your suede brush (the brass side is usually best for this) to brush away the remaining dried mud particles. Brush firmly but not aggressively, working the bristles into the nap to lift the dirt. Brush in multiple directions initially to dislodge particles, then finish by brushing in the direction of the nap.
- Eraser: For any stubborn marks left after brushing, use your suede eraser to gently rub them away.
- Final Brush: Finish with a final brush to restore the nap.
Oil and Grease Stains
These are some of the toughest stains to remove from suede because oil penetrates the fibers and is not water-soluble.
- How to treat:
- Act Immediately: The quicker you act, the better your chances.
- Absorb: Sprinkle a generous amount of an absorbent powder like cornstarch, talcum powder, or baking soda directly onto the oil stain. These powders help to draw the oil out of the suede fibers.
- Let it Sit: Let the powder sit on the stain for several hours, or ideally, overnight. The longer it sits, the more oil it can absorb.
- Brush Away Powder: After the waiting period, gently brush away the powder using your suede brush.
- Repeat if Necessary: For stubborn stains, you may need to repeat the powder application process.
- Suede Eraser: If a faint mark remains, try gently using your suede eraser.
- Professional Help: If the stain persists, it might be time to consult a professional shoe cleaner specializing in suede.
- Technical Detail: Absorbent powders work through a process called adsorption. The porous structure of the powder particles provides a large surface area that attracts and holds onto the oil molecules, effectively drawing them out of the suede fibers through capillary action and chemical affinity. Allowing the powder to sit for an extended period maximizes the contact time and the amount of oil that can be absorbed.
Handling specific stains requires patience and the right technique. Always test any cleaning method on an inconspicuous area first.
Beyond 10 Minutes: Advanced Suede Care
While the 10-minute routine is perfect for regular maintenance, there might be times when your suede loafers need a deeper clean or more intensive care. These situations might require more time and potentially different products or methods.
Deep Cleaning
If your loafers are heavily soiled or have accumulated grime over time that the basic routine can’t handle, you might need to consider a deeper cleaning.
- Suede Shampoos/Cleaners: There are specialized suede cleaning products available, often in liquid or foam form. These products are designed to lift dirt and stains from the suede fibers.
- How they work: These cleaners typically contain mild surfactants (like those in gentle soaps) that help to emulsify and lift dirt particles. They are formulated to be used with minimal moisture to avoid saturating the suede. You usually apply the cleaner, gently work it into a lather with a suede brush or cloth, and then carefully blot away the residue.
- Caution: Always follow the product instructions precisely. Use minimal moisture and allow the shoes to dry completely, stuffed with paper or shoe trees, away from heat. Deep cleaning can sometimes slightly alter the color or texture of the suede, so it’s wise to test on a hidden area first.
Professional Cleaning
For very valuable loafers, severe stains, or if you’re simply not comfortable attempting a deep clean yourself, professional shoe cleaning services are an excellent option.
- What they offer: Professionals have specialized knowledge, tools, and cleaning agents designed for different types of leather and suede. They can often tackle stains that are impossible to remove at home and can restore the nap and color of heavily worn suede.
- When to consider it: If you have a significant oil stain, dye transfer, or if the suede is severely matted and dirty, a professional cleaner is often the best bet to avoid damaging the shoes further.
Advanced care methods require more time and potentially more risk than the daily routine. They should be used sparingly and carefully when the basic maintenance isn’t sufficient.
Prevention is Key: Protecting Your Suede Loafers
The old saying “an ounce of prevention is worth a pound of cure” is incredibly true for suede loafers. Taking steps to protect your loafers before they get dirty or wet is the most effective way to keep them looking good with minimal effort. This is where your suede protector spray plays a crucial role.
The Importance of Protector Spray
Applying a quality suede protector is the single best thing you can do to prevent most common issues.
- How it helps: As discussed earlier, the protector creates a barrier that repels liquids and stains. This doesn’t make your suede loafers waterproof or stain-proof, but it significantly reduces the chances of damage from accidental spills, light rain, or stepping in a puddle. Instead of soaking in, liquids will often bead up on the surface, giving you time to gently blot them away before they can penetrate the suede fibers and cause a stain.
- Application Frequency: How often you need to apply protector depends on the product you use and how often you wear your loafers. A good rule of thumb is to reapply every few months, or after any significant cleaning that might have removed the protective layer. If you wear your loafers frequently, especially in varying conditions, consider applying it more often. Always apply to clean, dry suede.
Avoiding Bad Weather
This might seem obvious, but it’s worth stating: suede and significant moisture do not mix well.
- Rain and Snow: Try to avoid wearing your suede loafers in heavy rain or snow. Even with protector spray, prolonged exposure to moisture can cause damage, including water stains, salt stains (from snow melt), and can stiffen or damage the nap.
- Puddles and Wet Grass: Be mindful of where you’re walking. Stepping in a puddle or walking through wet grass can quickly soak the lower part of your loafers.
Choosing the right day and conditions to wear your suede loafers is a simple but effective preventative measure.
Wearing Your Suede Loafers Smartly
Beyond cleaning and protection, how you wear and store your suede loafers also impacts their longevity and appearance. Smart habits can reduce the need for intensive cleaning and keep them in better shape between maintenance routines.
Rotation is Important
Don’t wear the same pair of suede loafers every single day.
- Why rotate: Wearing shoes allows them to absorb moisture from your feet (sweat). Suede, being porous, is particularly susceptible to this. Giving your loafers a day or two off between wears allows them to air out completely and dry from the inside out. This helps prevent odor build-up and maintains the structural integrity of the shoe.
- Benefits: Rotation also reduces the overall wear and tear on a single pair, meaning each pair lasts longer and looks better over time.
Proper Storage
How you store your loafers when you’re not wearing them matters.
- Shoe Trees: Using shoe trees made of unvarnished cedar wood is highly recommended. Cedar shoe trees help to:
- Absorb moisture from the inside of the shoe, aiding in the drying process.
- Help the loafers retain their original shape, preventing creases and wrinkles from becoming permanent.
- Impart a fresh, clean scent.
- Storage Location: Store your suede loafers in a cool, dry place away from direct sunlight or heat, which can dry out and damage the suede. Avoid storing them in damp basements or humid closets.
- Dust Bags: If your loafers came with dust bags, use them! They protect the suede from dust and dirt accumulation while stored.
By rotating your footwear and storing your suede loafers correctly with shoe trees, you’re actively minimizing the factors that contribute to wear and tear and moisture damage, making your 10-minute maintenance routine even more effective.
Conclusion: Consistency is Key to Suede Longevity
Suede loafers are a worthwhile addition to any wardrobe, offering style and comfort that’s hard to beat. However, their unique texture demands a specific kind of care that differs significantly from smooth leather. The porous, napped surface that gives suede its distinctive look is also what makes it vulnerable to dirt, stains, and moisture. Ignoring this means your beautiful loafers can quickly lose their appeal.
The good news is that keeping your suede loafers looking great doesn’t have to be a time-consuming chore. By understanding the material and implementing a simple 10-minute maintenance routine regularly, you can prevent most problems and keep your footwear looking sharp. This routine, involving gentle brushing to lift the nap and remove surface dirt, using a suede eraser for targeted marks, and applying a protector spray, is your best defense.
Remember the essential tools: a good suede brush, a suede eraser, a quality protector spray, and a clean cloth. Use them correctly and consistently. While specific issues like water, mud, or oil stains require targeted treatment, often involving letting the shoe dry or using absorbent powders, regular maintenance significantly reduces the likelihood of these problems occurring or makes them easier to fix.
Beyond the quick clean, proactive measures like applying protector spray, avoiding bad weather, rotating your footwear, and storing your loafers properly with cedar shoe trees are crucial for long-term care. These habits minimize exposure to damaging elements and help maintain the shape and condition of the suede.
Ultimately, the key to enjoying your suede loafers for years to come is consistency. Dedicate just a few minutes regularly to this simple maintenance routine. It’s a small investment of time that pays off handsomely in preserving the look, feel, and lifespan of your cherished suede footwear. Don’t let the fear of maintenance keep you from enjoying the style and comfort of suede loafers. With the right knowledge and a little routine, you can keep them looking impeccable.