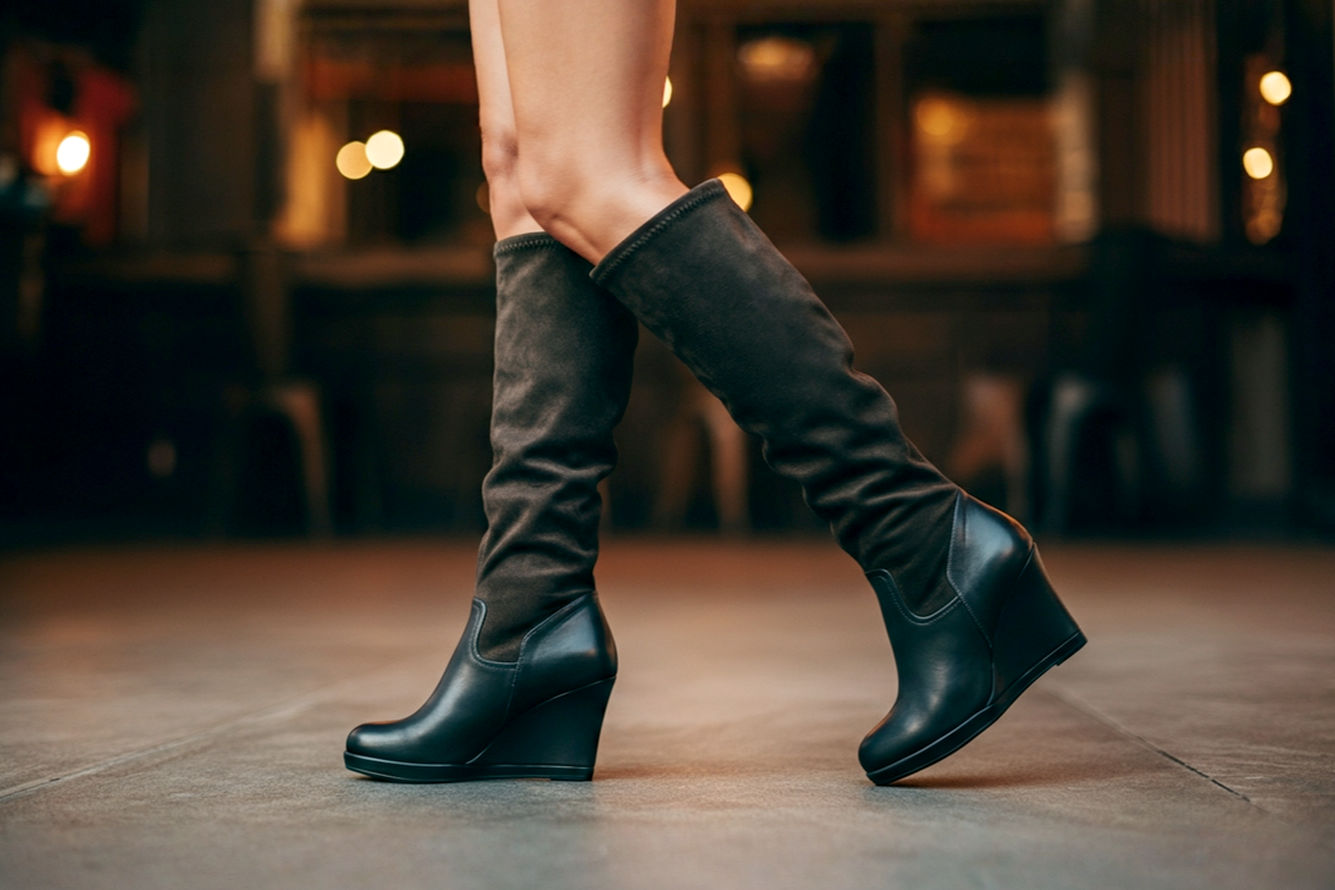
Wedge Knee Boots Problem? The Simple Hack to Stop Them From Bunching
Frustrated by your wedge knee boots bunching? Uncover the simple hack that combines inner friction and structural support, plus comprehensive long-term solutions for a perfect fit.
This post may contain affiliate links. If you make a purchase through these links, we may earn a commission at no additional cost to you.
Wedge knee boots are stylish, comfortable, and a fantastic addition to any wardrobe. They offer a unique blend of height and stability, making them a popular choice for many. However, if you own a pair, you’ve likely encountered a common and incredibly frustrating issue: the dreaded bunching. Whether it’s a subtle crinkle at the ankle or a full-on collapse of the boot shaft, slouching boots can instantly detract from your look and leave you constantly tugging them back into place. It’s a problem that affects countless boot wearers, transforming a chic outfit into a source of constant irritation.
This guide will dive deep into why your wedge knee boots (and other knee-high styles) simply refuse to stay up. More importantly, we’ll unveil a simple yet effective hack that combines readily available items to provide immediate relief from bunching. Beyond that quick fix, we’ll explore a comprehensive range of long-term solutions, from understanding proper fit to mastering boot care and even considering professional alterations. Our goal is to equip you with the knowledge and practical strategies you need to conquer the bunching problem, ensuring your boots look fabulous and stay put, allowing you to walk with confidence and comfort. Let’s reclaim the joy of wearing knee-high boots!
Understanding the “Wedge Knee Boots Problem”: Why Do They Bunch?
Before we dive into solutions, it’s crucial to understand why your wedge knee boots might be bunching. It isn’t just bad luck; several factors, often working together, contribute to this common annoyance. Identifying the root cause for your specific boots is the first step toward finding the perfect fix.
2.1. The Role of Boot Design and Construction
Sometimes, the problem starts right at the drawing board. Boot manufacturers design their products with different intentions, and not all knee-high boots are meant to stand rigidly upright.
Loose Shaft Design: Some boots are intentionally designed to have a “slouchy” aesthetic. This means their shafts are cut wider and from softer materials, allowing them to gently fall around the ankle or calf. While this can be a desirable style for some, it becomes a problem if you’re expecting a structured, upright look. If your boots have a very relaxed fit right out of the box, they might be designed to slouch, and forcing them to stay up can be an uphill battle.
Lack of Internal Structure or Reinforcement: High-quality boots often feature internal stiffeners, sometimes made of a thin, flexible plastic or a robust fabric lining, especially around the ankle and upper calf. These reinforcements help the boot maintain its shape. Less expensive or more fashion-forward boots might skip these structural elements to reduce costs or achieve a softer feel, making them more prone to collapsing. This lack of internal scaffolding means the material has nothing to hold it taut against your leg.
Boot Height Relative to Leg Length: The exact point where a knee-high boot hits your leg matters. If the boot shaft is too long for your specific leg, it might end up bunching below your knee, creating excess material that has nowhere to go but down. Similarly, boots designed for a taller person might hit your knee joint awkwardly, causing them to fold or crease right at that point with every step you take. The continuous bending and straightening of your knee then forces the boot material to fold.
2.2. Sizing and Fit Mismatches
Fit is perhaps the most critical factor in preventing boot bunching. Even a beautifully designed boot will slouch if it doesn’t fit your unique leg dimensions correctly.
Calf Circumference (Too Wide): This is one of the most common culprits. If the circumference of the boot shaft around your calf is too wide, there’s simply too much material for your leg to fill. This excess fabric has to go somewhere, and it typically folds down and collects around your ankle. A gap of more than an inch or two between your calf and the boot shaft is often a sign of a poor fit. When you walk, the boot slides down until it hits a narrower part of your leg (like the ankle), and then the extra material bunches.
Ankle Circumference (Too Wide, Creating Excess Material): While calf width gets a lot of attention, the fit around your ankle is equally important. Many people have narrower ankles compared to their calves, creating a natural tapering in their leg shape. If the boot’s ankle area is not sufficiently tapered or is too wide for your ankle, it leaves a “pocket” of empty space. The boot shaft then sinks into this space, causing the material to bunch and wrinkle directly above your foot. This is particularly noticeable when you flex your foot or walk, as the boot has room to move and crease.
Foot Size and Heel Slippage Contributing to Downward Movement: Surprisingly, how your foot fits in the footbed of the boot can also affect shaft bunching. If your foot slips significantly within the boot’s footbed (i.e., your heel lifts excessively with each step), it can cause the entire boot to pull downwards. This constant micro-movement puts downward pressure on the shaft, encouraging it to slouch and gather around the ankle. A boot that’s too large in length or width for your foot can lead to this issue, even if the calf fit seems reasonable.
2.3. Material Matters: How Fabric Affects Slouching
The type of material used in your boots plays a significant role in their propensity to bunch.
Soft Materials vs. Structured Materials: Boots made from very soft, supple materials like thin suede, soft nappa leather, or certain synthetic leathers are inherently more prone to slouching. These materials lack the natural rigidity to hold their shape against gravity and movement. In contrast, boots crafted from stiffer, thicker leathers (like full-grain leather or certain synthetic leathers with a firmer backing) or those with integrated structural elements (e.g., a reinforced textile lining) will maintain their upright posture much better. The internal molecular structure of these stiffer materials provides greater resistance to bending and creasing.
Aging and Stretching of Boot Materials Over Time: Even well-fitting boots made from initially structured materials can begin to slouch over time. Leather, especially, is a natural material that will soften and stretch with wear. As the leather breaks in, it becomes more pliable, and the fibers can relax, leading to a looser fit around the leg and an increased tendency to crease and bunch. This is accelerated by improper storage, which can allow the boot to fold and set in unwanted creases. Synthetic materials can also experience “fatigue” over time, losing their original stiffness and becoming more prone to collapse.
2.4. Your Anatomy and Movement
Finally, your unique body shape and how you move can also contribute to the problem.
Individual Leg Shape: Just as shoe sizes vary, so do leg shapes. Some individuals have very straight calves, while others have more pronounced curves or a significant taper from calf to ankle. Boots are designed with a general average in mind. If your leg shape doesn’t perfectly match the boot’s internal contours, it can create voids or pressure points that encourage the material to collapse. For instance, if your calf is much smaller than the boot’s widest point, or if your ankle is exceptionally narrow, the boot will find the path of least resistance and bunch.
Walking Patterns and Flexing Causing Creases: Every step you take involves flexing your ankle and knee. This natural movement causes the boot material to bend and crease. Over time, these repeated flexes can create permanent “memory” in the material, especially in leather or stiffer synthetics. The boot will then naturally want to fold at these established crease lines, even when you’re standing still. The constant motion essentially trains the boot to slouch in specific areas, particularly around the ankle joint, where the most significant flexion occurs.
By understanding these underlying causes, you can approach the problem of bunching wedge knee boots much more effectively, choosing the right hack or long-term solution.
Immediate Hacks: Quick Fixes for On-the-Go Slouching
Sometimes you need a solution right now. These immediate hacks can help your boots stay up for a night out, a special event, or just to get you through the day without constant tugging. They’re temporary fixes, but incredibly effective when you’re in a pinch.
3.1. The Power of Inner Layers
Adding an extra layer between your leg and the boot can dramatically increase friction and fill out excess space, providing stability.
Thick, Textured Socks: This is often the first line of defense. Opt for socks made from wool, cable knit, or even athletic socks with a good amount of cushioning. These materials create more friction against the boot’s lining than thin nylon or cotton socks. The added bulk of a thicker sock helps to fill any small gaps between your leg and the boot shaft, especially around the ankle and lower calf. This tighter fit reduces the room for the boot to slide down or fold. For best results, choose knee-high socks that provide continuous coverage from your foot up to where the boot shaft begins.
Layering Tights or Leggings: Similar to thick socks, wearing a pair of tights or leggings underneath your boots can provide a smooth, consistent layer of friction. The snug fit of tights or leggings ensures there’s no bare skin for the boot to slip against. For even better results, choose tights with a bit of texture or denier (thickness), such as wool-blend tights or opaque leggings. This slight increase in bulk and surface grip helps the boot “grab” onto your leg. The continuous surface also prevents the boot from catching on bare skin or seams of other clothing, which can sometimes initiate the slouching process.
DIY Sock Bunching for Ankle Padding: If your boots are particularly baggy around the ankles but fit reasonably well higher up, you can create a custom ankle ‘cushion’. Take an extra pair of thin socks (or even just one sock) and loosely bunch it up. Place this bunched sock around your ankle (over your primary sock or tights) before slipping on your boots. This fills the void at the narrowest part of your leg, giving the boot something to rest on and preventing it from collapsing into that empty space. This technique essentially creates an artificial “ankle” that’s a bit wider, forcing the boot to hold its shape there.
3.2. Adhesives and Temporary Holds
For a more direct attachment, fashion adhesives can work wonders.
Double-Sided Fashion Tape: This is the holy grail for many fashion emergencies, and it works surprisingly well for boots. Fashion tape is a specially designed adhesive that is skin-safe and strong enough to hold fabric in place. To use it, apply a few strips of the tape vertically along the inside of the boot shaft near the top edge, ensuring one side of the tape sticks to the boot lining. Then, press the boot firmly against your leg (or tights/leggings) to adhere the other side of the tape to your skin or hosiery. This creates a temporary bond that prevents the boot from sliding down. Pros: Relatively invisible, easy to apply, no permanent alteration. Cons: May not hold all day for very stubborn boots or with significant movement, can sometimes pull on leg hair, and may not be suitable for delicate boot linings that could be damaged by adhesive residue. Always test on an inconspicuous area first.
Specialized Boot Glue: Some brands offer liquid adhesives specifically designed for keeping boots up. These glues are typically roll-on or brush-on formulas that dry clear and are formulated to be safe for skin contact while providing a stronger, more flexible hold than fashion tape. You apply a thin line of glue to the inside top edge of the boot shaft and then press it against your leg. These glues are generally water-soluble for easy removal. They offer a more robust hold, making them ideal for long events or active days. They work by creating a temporary, flexible bond between the boot lining and your skin, effectively “gluing” the boot in place.
3.3. Simple Internal Supports
Sometimes, a little internal rigidity is all you need.
The “Plastic Bag” Trick: While it sounds unconventional, this is a clever hack for boots that are just slightly too wide or need a bit of extra grip. Before putting on your boots, place a thin plastic bag (like a grocery bag or a bread bag) over your foot and lower leg, extending up into the boot shaft. As you pull on the boot, the plastic bag creates a very slick surface, allowing your foot to slide in easily. Once the boot is on, carefully tear off and remove the excess plastic bag from around your ankle. The remaining plastic inside the boot shaft, particularly if it’s slightly crinkled, creates a subtle layer of friction and bulk that helps the boot grip your leg and prevents it from sliding down. It’s an instant, no-cost solution.
Rolled-Up Card or Magazines (Temporary Internal Structure): This method is more commonly suggested for boot storage, but it can be adapted for temporary wear. Take a sheet of thin, flexible cardboard (like from a cereal box) or several pages of a magazine, roll them tightly into a cylinder, and insert them into the boot shaft around your ankle/lower calf area before putting the boot on. The rigid cylinder acts as a temporary boot shaper, forcing the boot material to stay upright and preventing it from collapsing. This works best for boots that have a reasonable overall fit but just need that extra bit of stiffness to prevent ankle bunching. Ensure it’s comfortable and doesn’t restrict your circulation.
Elastic Hair Ties or Bands Around the Leg: For boots that slip down from just below the knee, a simple elastic hair tie or a thin elastic band can be a surprisingly effective solution. Put on your boots as usual. Then, wrap an elastic hair tie or band around your leg just above the top edge of the boot shaft. The elastic creates a slight compression and a “shelf” for the boot to rest on, preventing it from sliding further down your leg. Choose a band that isn’t too tight to avoid discomfort or circulation issues. This method works best if your boots are only slipping a short distance and have a relatively straight top edge.
3.4. Strategic Folding and Styling
Sometimes, embracing a different look can solve the problem.
Folding the Boot Shaft Inward or Outward: This hack works particularly well for boots made from softer, more pliable materials like suede or very soft leather. Instead of fighting the slouch, you can intentionally create a clean fold at the top of the boot. By folding the top edge inward or outward, you can effectively shorten the boot shaft and create a snugger fit around your calf. An inward fold gives a cleaner, more streamlined look, while an outward fold can add a stylish cuff detail. This method not only tightens the fit but also transforms the boot’s silhouette, sometimes making the “bunching” look intentional rather than accidental.
Considering Intentional “Slouchy” Styling: If all else fails, perhaps the simplest solution is to embrace the slouch! Some boots, especially those with a relaxed design, look great with a natural slouch. Instead of viewing it as a problem, consider integrating it into your outfit. Push the boot down deliberately to create soft, artful folds. This can give your outfit a more casual, bohemian, or effortless vibe. While it won’t prevent the bunching, it reframes it as a styling choice rather than a malfunction.
These immediate hacks offer quick relief, but for a truly lasting solution, it’s worth exploring long-term strategies.
Long-Term Solutions: Preventing Bunching from the Start
While quick hacks can save the day, truly eliminating boot bunching often requires a more proactive approach. These long-term strategies focus on proper fit, dedicated accessories, material care, and even professional assistance to ensure your boots stay upright wear after wear.
4.1. The Importance of Proper Boot Fit
The best way to prevent bunching is to buy boots that fit correctly from the very beginning. This goes beyond just foot size.
Measuring Your Calves and Ankles Accurately: Many people overlook this crucial step. Before buying knee-high boots, measure the widest part of your calf and the narrowest part of your ankle. Compare these measurements to the boot’s shaft circumference, which is usually listed in product descriptions. Don’t assume standard sizing will work for everyone; calf sizes vary widely. Some brands offer “wide calf” or “petite calf” options, which can make a huge difference in achieving a snug fit. Getting these measurements right ensures you’re not buying a boot with too much excess material around your leg.
Trying Boots on with Appropriate Hosiery/Clothing: Always try on boots with the kind of hosiery or trousers you plan to wear with them most often. If you typically wear thin tights, try them on with thin tights. If you usually wear jeans tucked in, wear your typical jeans. This helps you assess the true fit. A boot that feels snug over bare skin might be too tight with thick socks, or conversely, a boot that seems to fit over jeans might be too loose when worn with sheer stockings. The goal is to replicate your real-world usage conditions during the fitting process.
Looking for Adjustable Features (Laces, Buckles, Elastic Inserts): Boots with adjustable elements offer a significant advantage. Lacing up the back or front of the boot, adjustable buckles around the calf, or integrated elastic panels can help customize the fit to your leg. Elastic gussets, often found along the inside seam of the boot, provide flexibility and allow for a more forgiving fit, conforming better to your leg shape without causing excessive bagginess. These features allow you to tighten or loosen the boot shaft as needed, reducing excess material that could lead to bunching.
Considering Wide Calf Options vs. Standard Fit: For those with wider calves, “wide calf” boots are a game-changer, designed to accommodate larger measurements without squeezing. Conversely, if you have very slender calves, look for brands that specifically offer “petite” or “narrow calf” boot styles. Standard-fit boots are often too wide for slender legs, leading to inevitable slouching. Opting for a boot that matches your calf circumference as closely as possible is paramount for preventing bunching.
4.2. Investing in Boot Accessories
A variety of products exist specifically to help boots maintain their shape and stay upright.
Boot Shapers/Trees: These are essential for long-term boot care and prevention of slouching. Boot shapers are inserts designed to keep the boot shaft upright and prevent it from collapsing, creasing, or folding during storage. When a boot is left to flop over, the material develops memory creases, making it more likely to slouch when worn.
- Types: There are various types, including spring-loaded shapers (which apply gentle outward pressure), inflatable shapers (which you inflate to fill the boot), and simple foam or cardboard inserts. Spring-loaded shapers are particularly effective as they adapt to the boot’s specific shape.
- DIY Alternatives: If you don’t want to buy specialized shapers, you can create your own. Rolled-up newspapers or magazines, cardboard cylinders (like from paper towel rolls, taped together), or even cut-to-size pool noodles can serve a similar purpose, providing internal support to keep the boot shaft straight when not in use.
Boot Straps and “Boot Bras”: These innovative accessories provide a direct connection between the boot and your leg.
- How they work: Typically, they consist of an elastic loop that goes around your thigh (often just above the knee) and attaches to the inside of the boot shaft with hook-and-loop fasteners (like Velcro) or small clips. The elastic provides a gentle upward pull, keeping the boot from sliding down your leg. The “boot bra” concept is a popular example, effectively creating a garter for your boot.
- DIY Boot Bra Instructions: You can make your own with a few simple materials. You’ll need:
- Knit elastic (about 1-inch wide, comfortable against the skin)
- Industrial-strength hook-and-loop fastener strips (the sew-on or heavy-duty adhesive kind)
- Sewing materials (needle and thread or a sewing machine) and scissors. Steps:
- Measure your thigh circumference about 1-2 inches below where the top of your boot sits. Cut the elastic to this length, ensuring it’s snug but comfortable.
- Sew the ends of the elastic together to form a comfortable loop.
- Attach one side of the hook-and-loop fastener (e.g., the “hook” side) to the outside of the elastic loop.
- Attach the corresponding piece of the hook-and-loop fastener (the “loop” side) to the inside of your boot shaft, about half an inch down from the top edge. Ensure it’s placed where it will align with the elastic loop. You might use fabric glue for a non-sew option if the boot material allows.
- To wear, slip the elastic loop over your thigh, pull the boot up, and align the fasteners to snap them together. This provides a discreet anchor that keeps the boot from slipping.
Ankle Inserts/Padding: These are designed to specifically address the gap around the ankle. They are often made of soft foam or silicone and are shaped to fit inside the boot’s ankle area. By filling this void, they prevent the boot material from collapsing into the empty space, maintaining a smoother silhouette. Some are self-adhesive, while others rely on the snugness of your leg and sock to stay in place.
4.3. Material Care and Reinforcement
The condition of your boot’s material directly impacts its ability to hold shape.
Leather Conditioning: Regular conditioning is vital, especially for leather boots. Leather can become stiff and prone to creasing if it dries out, but it can also become overly soft and lose its structure if over-conditioned or if the wrong type of conditioner is used.
- Frequency and Types: Use a high-quality leather conditioner (like a cream or oil-based formula) every few months, or more frequently if you wear your boots often or live in a dry climate. Apply it sparingly and buff off any excess. This keeps the leather supple, preventing cracking and promoting flexibility without making it excessively soft and prone to collapsing. Avoid heavy oil conditioners on very soft leather if slouching is a primary concern.
Stiffening the Shaft (DIY & Professional): If the boot material itself is too flimsy, you might need to add rigidity.
- Water/Alcohol Spray and Reshaping (for Leather): For genuine leather boots, a technique to stiffen or reshape involves lightly misting the inside of the boot shaft with a mixture of water and rubbing alcohol (e.g., 50/50). As the leather dampens, it becomes more pliable. You can then insert a boot shaper or tightly rolled magazines and allow the boot to dry completely in that upright position. As it dries, the leather will stiffen and “remember” the new shape. Be cautious not to oversaturate the leather.
- Inserting Rigid Strips (Plastic or Thin Metal): Several products, sometimes called “No Slouch Boot Straight” or similar, involve inserting thin, flexible plastic or metallic strips vertically along the inside of the boot shaft. These strips are typically adhesive-backed or can be sewn in for a more permanent solution. They act as internal splints, providing the necessary rigidity to keep the boot upright. You can also create your own using a thin, flexible plastic sheet (like from a binder divider) cut to size. These strips work by physically preventing the material from folding or collapsing.
- Professional Cobbler Services for Structural Reinforcement: A professional cobbler can assess your boots and may offer services like adding a stiffer lining, inserting permanent structural supports, or reinforcing specific areas prone to bunching. They have access to specialized materials and techniques that might not be available for DIY attempts.
Addressing Heel Slippage: This is a crucial, often overlooked aspect. If your heel lifts excessively inside the boot with each step, it creates a downward pulling motion that encourages the shaft to slouch.
- Insoles: Adding a full-length or 3/4-length insole can take up extra space, making the overall fit more snug and reducing heel lift.
- Heel Grips: These are adhesive pads that stick to the inside of the boot’s heel area, providing extra friction and cushioning to prevent your heel from slipping.
- Tongue Pads: While typically for laced shoes, a small pad placed under the boot’s “tongue” area (the top part of your foot where the instep is) can also help push your foot back into the heel, minimizing forward slide and heel lift. By stabilizing your foot within the boot, you eliminate the downward force that contributes to shaft bunching.
4.4. Professional Alterations: When to See a Cobbler
For persistent problems or significant fit issues, a professional cobbler can perform permanent alterations.
Taking in the Calf or Ankle Circumference: This is the most common professional alteration for slouching boots. A skilled cobbler can carefully remove a vertical strip of material from the boot shaft (usually along the inside seam or back seam) and then re-stitch it, effectively narrowing the circumference. This provides a custom, snug fit that eliminates excess material. The cost will vary depending on the boot material and complexity.
Adding Elastic Panels: If your boots are too tight in some areas but too loose in others, or if you need more flexibility, a cobbler can insert elastic gussets or panels into the boot shaft. This allows the boot to stretch and conform to your leg more effectively while maintaining a closer fit in other areas. This is often done subtly along the inner seam or back of the boot.
Re-lining or Reinforcing the Boot Shaft: For boots with a very soft or worn-out lining, a cobbler can replace it with a stiffer material or add an additional layer of reinforcement, like a firm textile or thin leather, to the inside of the shaft. This provides renewed structural integrity, helping the boot maintain its upright shape.
Seeing a cobbler is an investment, but for high-quality or beloved boots, it can be a worthwhile solution that ensures a perfect, lasting fit and eliminates the bunching problem permanently.
The “Simple Hack” Unveiled: Combining Friction and Structure
While all the previous tips are valuable, there’s a particular “simple hack” that effectively tackles the wedge knee boots bunching problem by addressing both the lack of friction and the excess material in the ankle area simultaneously. This method is incredibly practical because it uses common items and focuses on targeted support.
5.1. The Principle: How a Combination of Inner Friction and Subtle Structural Support Works Best
The core problem with slouching boots boils down to two main issues:
- Lack of Friction: The boot lining slides too easily against your skin or thin hosiery, allowing the shaft to slip downwards.
- Excess Material/Space: There’s too much room around your ankle or lower calf, creating a “void” into which the boot material can collapse and wrinkle.
The simple hack combines solutions for both. It builds a supportive foundation around your lower leg and ankle that the boot can effectively grip, preventing downward slide. At the same time, it subtly fills the empty space that causes the bunching, giving the boot shaft the firm structure it needs to stay upright. Think of it as creating a custom, invisible “scaffolding” inside your boot, specifically where it wants to sag most. This isn’t about just one product; it’s about a layered approach using readily available items.
5.2. Step-by-Step Implementation
Here’s how to apply this simple, yet powerful, hack:
Step 1: Foundation with Friction – Choosing the Right Socks/Tights Begin with a solid base. Your first layer of hosiery should provide good friction and a relatively smooth surface.
- Choice: Opt for knee-high socks made of a thicker, textured material like wool, a wool blend, or a substantial cotton blend. Alternatively, wear opaque tights or leggings that extend fully up your leg. Avoid thin, slippery nylons if possible, as they offer minimal grip.
- Why it works: This layer acts as the primary contact point with the boot’s lining. The texture of the fabric creates friction, inhibiting the boot from sliding down. The natural slight bulk of these materials also helps to take up some of the initial slack in the boot shaft.
Step 2: Targeted Ankle Padding (The “Hack”) – Creating a Custom Ankle Cushion This is the heart of the simple hack, directly addressing the ankle bunching.
- Method: Over your foundational sock or tights, you’re going to create a custom padding around your ankle. You can use:
- Folded Socks: Take a pair of thin dress socks or ankle socks. Fold or roll each sock into a small, relatively flat “doughnut” or cylinder.
- Thin Foam/Felt Pieces: Cut a strip of thin, soft craft foam (like 2mm thickness) or felt, about 2-3 inches wide and long enough to wrap comfortably around your ankle.
- Soft Cloth Wraps: A strip of soft, breathable fabric (e.g., from an old t-shirt, cut into a strip) can also work.
- Application: Place this folded sock, foam, or cloth wrap directly around your ankle, underneath the primary knee-high sock if possible, or directly against your skin if you’re wearing tights. Position it so it fills the gap where your boot tends to bunch. The goal isn’t to make your ankle feel constricted, but to create a subtle, comfortable bulge that forces the boot material to stay taut. You might need to experiment with the thickness of the material to find what works best for your boot and ankle.
- Why it works: This “ankle cushion” serves two main purposes. First, it physically fills the empty space at your ankle, preventing the boot shaft from collapsing into it. Second, it creates a slightly wider base just above your foot, giving the boot material something solid to rest on, effectively “holding up” the rest of the shaft. It lifts the boot slightly, preventing it from sinking and wrinkling.
Step 3: External Hold (Optional but Recommended) – Strategic Tape or Strap For extra security, especially with very loose boots, add an external anchor.
- Double-Sided Fashion Tape: Apply a strip (or two, if needed) of strong, double-sided fashion tape horizontally around the inside top edge of the boot shaft. Ensure it adheres well to the boot lining.
- Thin, Adjustable Elastic Strap (Boot Garter): Alternatively, use a purpose-built boot garter or a thin elastic band with a clip. Wrap it around your leg just below your knee or at the very top of the boot shaft, and secure it to the boot lining if it has an attachment point.
- Why it works: This step provides a final anchor point. The fashion tape creates a strong, yet temporary, bond between the top of the boot and your hosiery/skin, preventing it from sliding down. An elastic strap acts as a “suspender,” gently pulling the boot upwards and holding it against your leg. This ensures that even if the ankle padding shifts slightly, the top of the boot remains in place, maintaining overall shaft integrity.
Step 4: Proper Donning – Gently Pulling Up the Boot
- Execution: With your foundational layer and ankle padding in place, carefully slip your foot into the boot. Gently pull the boot shaft up, ensuring the ankle padding settles comfortably and is not bunched up or causing discomfort. Smooth out the boot material along the shaft as you pull it up.
- Final Adjustment: Walk a few steps and make any minor adjustments to ensure the ankle padding feels right and the boot isn’t pinching anywhere. The boot should feel snug but not restrictive.
5.3. Why This Hack Works: Addresses Both Lack of Friction and Excess Material/Space
This simple hack is effective because it tackles the multi-faceted nature of boot bunching with a layered approach:
- Increased Friction: The primary sock/tights layer provides a grippy surface, reducing the boot’s ability to slide downwards.
- Targeted Volume: The ankle padding directly fills the “empty space” that causes bunching. This gives the boot’s material something to mold around, preventing it from collapsing and creating unwanted wrinkles. By creating this slightly wider, supportive base at the ankle, the entire shaft is encouraged to stay upright.
- Upward Stability: The combination of friction and internal volume creates a subtle upward pressure, resisting gravity’s pull on the boot shaft. The boot no longer has room to sag into the narrower ankle area.
- Anchoring (with tape/strap): The optional external hold ensures that even if the internal support isn’t perfect, the top of the boot remains secured to your leg, providing a secondary line of defense against slippage.
This hack is simple, uses readily available items, and can be customized to the specific needs of your boots and leg shape. It’s a game-changer for maintaining the sleek, upright look of your wedge knee boots without permanent alterations.
Beyond the Hack: General Boot Care and Maintenance for Longevity
Implementing the “simple hack” will provide immediate relief from bunching, but for your wedge knee boots to maintain their pristine appearance and stay upright for years to come, proper care and maintenance are non-negotiable. Consistent care extends the lifespan of your boots and prevents the very issues that lead to slouching.
6.1. Correct Storage: Always Use Boot Shapers or Stuffing
Improper storage is a leading cause of boot slouching and permanent creasing. When boots are left to flop over, the material (especially leather) develops “memory” in those folded positions. When you next wear them, these creases act as weak points, encouraging the boot to collapse exactly where it was stored improperly.
- Boot Shapers: These are specifically designed tools to keep the boot shaft upright and taut. They come in various forms:
- Spring-loaded shapers: These are often made of plastic or metal and use a spring mechanism to expand and fill the boot shaft, applying gentle outward pressure. They are highly effective as they adapt to the boot’s specific width.
- Inflatable shapers: These are flexible plastic inserts that you inflate once inside the boot, providing customized support. They are great for travel or compact storage.
- Foam or cardboard inserts: These are simpler, often contoured pieces of foam or rigid cardboard that slot into the boot shaft to hold its shape.
- DIY Stuffing Alternatives: If you don’t have dedicated boot shapers, you can create effective alternatives:
- Rolled-up newspapers or magazines: Tightly roll clean newspapers or glossy magazines and insert them firmly into the boot shaft. Ensure they fill the entire length of the shaft to prevent slouching at any point.
- Pool noodles: Cut sections of standard pool noodles to the exact height of your boot shaft. These are excellent because they are lightweight, inexpensive, and provide firm, cylindrical support.
- Empty plastic bottles: Clean, empty plastic water or soda bottles can be used to fill the foot and ankle area, preventing crushing and providing a base for other stuffing materials in the shaft.
Why it matters: Proper storage ensures the boot’s material remains smooth, uncreased, and retains its original upright posture. It prevents gravity from causing permanent deformation and reinforces the boot’s natural structure. When you pull them out of storage, they’ll be ready to wear without immediate signs of slouching.
6.2. Regular Cleaning and Conditioning: Extending Life and Preserving Material Integrity
Just like your skin, boot materials need regular care to stay in optimal condition. This isn’t just about aesthetics; it’s about preserving the material’s structural integrity.
- Cleaning: Dust, dirt, and grime can accumulate on boots, especially if worn outdoors. For leather, use a soft, damp cloth to wipe away surface dirt. For suede, use a specialized suede brush to remove debris and restore the nap. Regular cleaning prevents abrasive particles from damaging the material over time.
- Conditioning (for leather): Leather can dry out, become stiff, and eventually crack if not properly moisturized. Dry, brittle leather is also more prone to developing sharp, irreversible creases that lead to slouching.
- Process: Apply a high-quality leather conditioner (cream, oil, or wax-based, depending on the leather type) with a soft cloth. Work it into the leather in small circular motions, then allow it to absorb. Buff off any excess. This replenishes the natural oils, keeping the leather supple, flexible, and resilient.
- Benefits: Conditioned leather resists creasing better, stretches more evenly, and maintains its original form for longer. It remains pliable enough to move with your leg without immediately creating permanent folds.
- Protection Sprays: For both leather and suede, consider using a waterproofing or protective spray. These sprays create an invisible barrier against moisture and stains, which can degrade the material and cause it to lose its shape prematurely.
6.3. Avoiding Over-Stretching: Being Mindful of How Boots Are Put On and Taken Off
While leather will naturally stretch and conform to your foot, excessive or improper stretching can weaken the material and accelerate slouching.
- Gentle Donning: When putting on your boots, avoid forcibly yanking them up by the shaft. Instead, use a boot horn to guide your foot smoothly into the footbed. If your boots have a zipper, open it fully. Once your foot is in, gently pull the shaft up, smoothing the material as you go.
- Careful Removal: Similarly, don’t just kick your boots off. Unzip them fully and gently pull them down by the heel or the sturdy lower part of the shaft. Avoid grabbing and pulling the very top edge, as this can stretch the opening and weaken the material over time.
- Sitting to Don/Doff: Whenever possible, sit down when putting on and taking off your boots. This provides better leverage and control, reducing strain on the boot material.
By incorporating these general boot care practices into your routine, you’re not just making your boots last longer; you’re actively preventing the material breakdown and structural weakening that often lead to the frustrating problem of bunching. A well-cared-for boot is a well-behaved boot.
Conclusion: Walk Confidently, Ditch the Bunching
The frustration of dealing with bunching wedge knee boots is a shared experience for many fashion enthusiasts. What begins as a chic footwear choice can quickly become a source of constant adjustment and self-consciousness when the boot shaft refuses to stay in place. From subtle ankle crinkles to dramatic collapses, slouching boots detract from your overall look and undermine the very confidence you hope to project.
Throughout this guide, we’ve dissected the core reasons behind this widespread problem, recognizing that it’s often a combination of boot design, fit imperfections, material characteristics, and even your own unique anatomy. Understanding these underlying causes – whether it’s an intentionally slouchy design, a wider calf circumference, the pliability of soft suede, or the natural flexion of your ankle – empowers you to select the most appropriate solution.
We’ve explored an array of strategies, from immediate, on-the-go hacks that provide quick relief to more comprehensive, long-term solutions that address the problem at its root. The “simple hack” unveiled – which combines the strategic layering of thick, textured socks or tights with targeted ankle padding and an optional external hold from fashion tape or a boot strap – stands out as an exceptionally effective method. This ingenious approach works by simultaneously increasing friction and filling the excess space, creating a stable, upright foundation for your boot. It’s a versatile technique that can be customized to fit your specific needs and boot style.
Beyond the quick fixes, remember that proactive care is paramount. Investing in proper boot shapers or utilizing DIY stuffing alternatives for storage, coupled with regular cleaning and conditioning, will significantly extend the life of your boots and prevent them from losing their shape. For persistent fit issues, don’t hesitate to consult a professional cobbler; their expertise in alterations can provide a permanent, tailored solution.
Ultimately, preventing your wedge knee boots from bunching is about understanding the mechanics of the problem and employing the right combination of hacks, accessories, and consistent care. Don’t let this common footwear woe diminish your style or comfort. Experiment with the techniques discussed, find what works best for you, and walk confidently knowing your boots will stay where they belong – looking fabulous on your legs, not pooling around your ankles. It’s time to ditch the bunching and fully enjoy the effortless elegance of your wedge knee boots!